1. Disclaimer
2. Safety information
Handling
Repair & service
Powering your device
Radio frequency interference
Medical device interference
Child safety
3. Disposal and recycling information
4. Warranty
5. Welcome to SpectroLink™
6. What is in the box
7. Prerequisites
8. Setting up SpectroLink™
Powering your device
Network setup
Connecting SpectroLink™ to the spectrophotometer
Access SpectroLink™ in SpectroWorks™
9. Using your SpectroLink™ device
9.1. Creating a new project
9.2. The SpectroLink™ dashboard
9.2.1. Dashboard controls
9.2.2. Scanning spectrophotometer
9.2.3. Diode array spectrophotometer
9.3. SpectroLink™ properties
9.4. Network discovery
9.6. Software updates
10.1. Setup spectrophotometer for measurement
10.2. Basic measurement
*You can download the User Manual at the bottom of the page
1. Disclaimer
The information in this document is subject to change without notice and does not represent a commitment on the part of Copenhagen Nanosystems A/S.
“SpectroLink™”, “SpectroWorks™” and associated logos are trademarks of Copenhagen Nanosystems A/S.
All other trademarks are the property of their respective owners and use of them does not imply any affiliation with or endorsement by them.
Document authored by:
Copenhagen Nanosystems A/S, Hørmarken 2, DK-3520 Farum, Denmark
For SpectroLink™:
|
Software version: |
1.8.2 |
|
Hardware version: |
1.1.0 |
Published:
July 25th 2024
2. Safety information
To avoid damaging your device, accessories or any connected devices, and to reduce the risk of personal injury, discomfort, property damage or other potential hazards, follow the precautions below.
Handling
Handle your SpectroLink™ with care. Do not drop, bend, burn, crush or puncture it. Do not use a device with a damaged enclosure.
Be sure that the SpectroLink™ device, power adapter, and cable is kept safe from physical damage during operation. Using a damaged product may cause injury. Do not expose your device to moisture or liquids, which can cause a short circuit or overheating. If your device gets wet, do not attempt to dry it using an external heat source.
SpectroLink™ is designed to operate in a dry, indoor environment with ambient temperatures between 0 °C and 50 °C and should be stored in ambient temperatures between -20 °C and 70 °C. Do not cover your SpectroLink™ during operation as this may damage the product or pose a potential risk of fire. Keep your device away from heat sources and out of direct sunlight.
All peripherals, such as spectrophotometers, used with this product should comply with relevant standards for the country of use and be marked accordingly to ensure that safety and performance requirements are met.
Repair & service
Do not attempt to repair your SpectroLink™ yourself. Disassembling the device may cause injury to you or damage your device.
Contact customer service and do not use your device if it isn’t working properly or has been damaged. For online help and support, visit: spectrolink.cphnano.com.
To reach an expert, visit: https://knowledge.cphnano.com/en/pages/support-for-spectrolink.
Powering your device
Only power your SpectroLink™ with the included power adapter and cable. Failure to do so can cause fire, electric shock, injury, or damage to the device and the accessories.
Using a damaged cable or power adapter can cause fire, electric shock, injury, or damage to your device or other property. When powering the device make sure the power adapter is plugged into a socket near the device and is easily accessible.
Do not attempt to take apart or open the power adapter. Contact with live wires and components can expose you to life-threatening electrical shock.
The power adapter may become warm when in use and should not be covered. Take care to keep the power adapter in an open space with access to free air in order to ventilate it in the best possible manner. Be sure to not expose the power adapter to extreme heat conditions.
When disconnecting the power adapter from a power outlet, be sure that the plug pulls out straight directly from the wall. Pull on the adapter, never on the cable. Do not twist or pinch the cable, and do not force a connector into a port.
Radio frequency interference
Observe rules that prohibit the use of wireless technology (e.g. WiFi). Your device is designed to comply with regulations governing radio frequency emissions but use of wireless devices can negatively affect other electronic equipment.
Medical device interference
Your device uses radios and other components that emit electromagnetic fields. These electromagnetic fields and magnets may interfere with pacemakers and other implanted medical devices. Always keep the product and its power adapter at a safe distance away from the pacemaker or other implanted medical device. If you have questions about using your device with or near your pacemaker or other implanted medical device, consult your healthcare provider before using your product. If you suspect your product is interfering with your pacemaker or other implanted medical devices, turn off your device and consult your physician for information specific to your medical device.
Child safety
This device is not a toy. Your product may contain (or may come with) small parts, plastic elements, and parts with sharp edges that may cause an injury or create a choking hazard. Children have strangled on cords and cables. Keep SpectroLink™’s cables out of the reach of children and do not allow them to play with the device or its accessories. They could hurt themselves or others or could accidentally damage the product. Consult a physician immediately if small parts are swallowed.
3. Disposal and recycling information
The WEEE symbol above means that according to
local laws and regulations, your product should be disposed of separately from household waste. When this product reaches its end of life, take it to a collection point designated by local authorities for safe disposal or recycling.
It is the responsibility of the user to dispose of the equipment using a designated collection point or service for separate recycling of waste electrical and electronic equipment (WEEE) according to local laws. Proper collection and recycling of your equipment helps ensure electrical and electronic equipment (EEE) waste is recycled in a manner that conserves valuable materials and protects human health and the environment.
4. Warranty
This product has a 2 year limited guarantee of conformity in accordance with the European directive 1999/44/EC, which is supplied by the manufacturer for products sold within the European Union.
5. Welcome to SpectroLink™
Thank you for choosing SpectroLink™. It is because of customers like you that we can continue to build deep-tech based laboratory solutions that significantly increases productivity and lowers downtime in the laboratories around the world. SpectroLink™ is your new streaming device between the online laboratory workspace, SpectroWorks™ and your spectrophotometer. It cuts away the use of platform-dependent software by offering a clean and user-friendly end-to-end experience between you and your spectrophotometer through SpectroWorks™.
This documentation covers all the information needed to get started with your spectrophotometer using SpectroLink™ and SpectroWorks™.
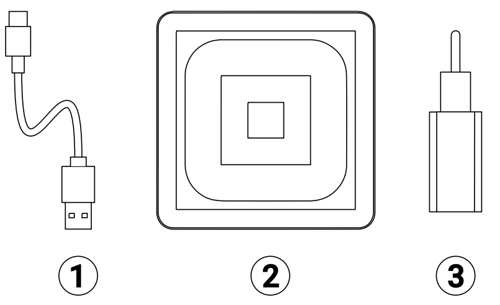
6. What is in the box
- 1m USB-A to USB-C cable for power
- SpectroLink™
- Power adapter
7. Prerequisites
- SpectroLink™, power adapter, and cable.
- A supported1 spectrophotometer.
- A web-enabled device with a suitably sized screen for using SpectroWorks™ (tablet, laptop etc.).
- Internet access via ethernet or WiFi.
1 See https://spectrolink.cphnano.com/supported-spectrophotometers for supported models.
8. Setting up SpectroLink™
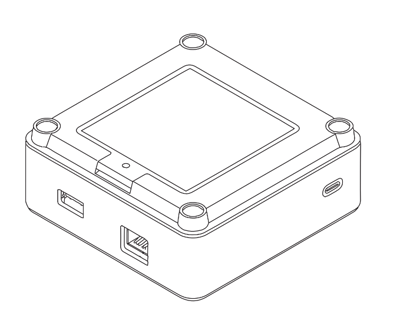
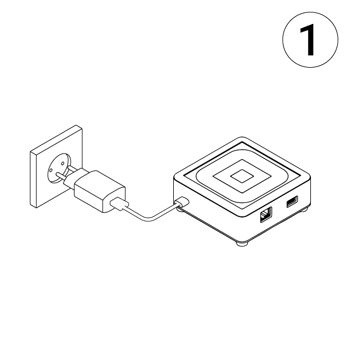 Powering your device
- With the included power adapter and USB cable, connect the USB-A end of the cable to the power adapter.
- Plug in the power adapter to a power outlet.
- Connect the USB-C end of the cable to the USB-C socket of your SpectroLink™.
Network setup
Wifi
See spectrolink.cphnano.com/setup
Ethernet
Connect your SpectroLink™ to the ethernet port on a wall or router using an ethernet cable.
SpectroLink™ will automatically detect which network type to use.
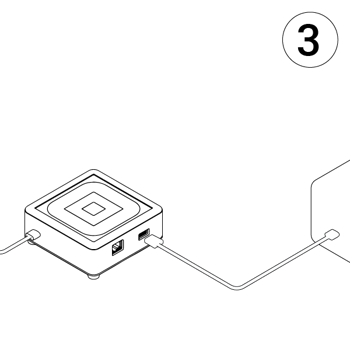 Connecting SpectroLink™ to
the spectrophotometer
- Connect the USB cable to the USB-A socket on your SpectroLink™ and the other end to your spectrophotometer.
- Power on your Spectrophotometer.
- Enable USB mode (“PC Control”) on your Spectrophotometer if necessary.
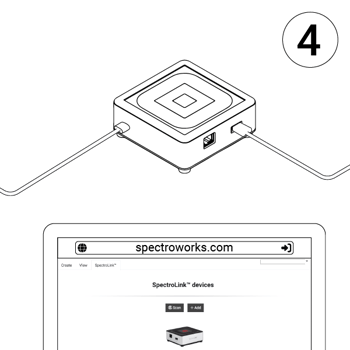
Access SpectroLink™
in SpectroWorks™
Now you can access our online software SpectroWorks.com to start measuring, analyzing and reporting results.

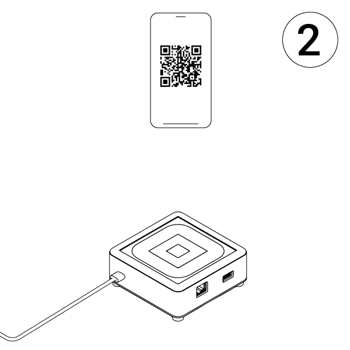
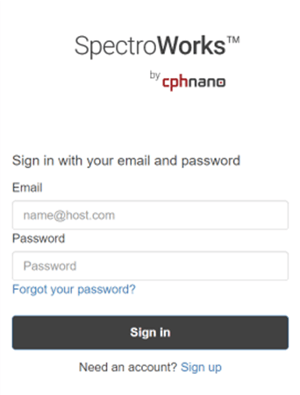
- From SpectroWorks.com, click “Sign In” to access your SpectroWorks™ account.
- Create a new project or open an existing project.
- Switch to the “SpectroLink™” tab on the top left.
Each SpectroLink™ contains a unique device code that is located on the bottom of the unit. This code is used to link your SpectroLink™ to your SpectroWorks™ account. Do not share this code.
To register the device code of your SpectroLink™:
-
- Click “+ Add” and enter the device code.
- Click “Add” to confirm. This should add your SpectroLink™ to your list of registered devices. Click “Close”.
- Click the SpectroLink™ image to connect.
9. Using your SpectroLink™ device
9.1. Creating a new project
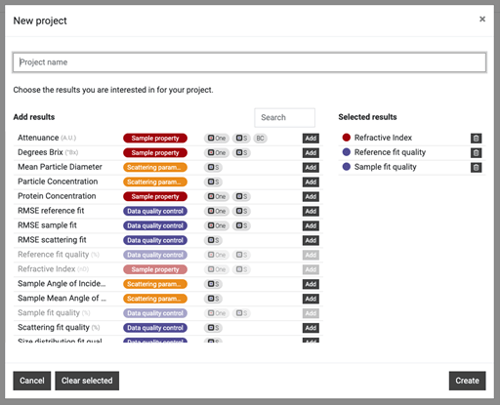
To create a new project, click “New Project”. Name your project and select the type of results you are interested in. This can always be changed later. Note that some results require specific cuvettes, such as NanoCuvette™ One and NanoCuvette™ S, as indicated by the icons next to the results.
9.2. The SpectroLink™ dashboard
Once inside a project, your SpectroLink™ can be accessed from the “SpectroLink™” tab on the top left. Your device will appear with the default name: “My SpectroLink™”.
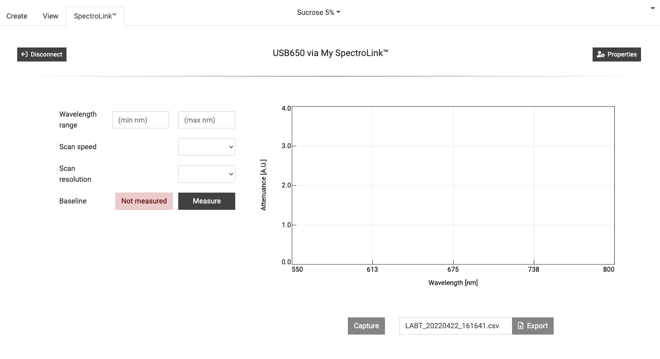
Once connected, you will see the SpectroLink™ dashboard. In the image below is an example of a dashboard with no spectrophotometer connected.
.png?width=660&height=382&name=XQfBv1mc%20(1).png)
Once an instrument has been connected, it must be linked to SpectroLink™ by clicking the green link button and choosing the appropriate spectrophotometer model.
Depending on the spectrophotometer used, the user interface of the SpectroLink™ dashboard changes according to what your instrument supports.
9.2.1. Dashboard controls
On the SpectroLink™ dashboard you can set various settings on your spectrophotometer and set it up for measurements. You can set the wavelength range, scan speed, etc. The dashboard includes a spectrum graph where you can easily capture and save a spectrum using the buttons below. This area helps you check if your spectrophotometer settings are correct.
If this is your first time using SpectroLink™ with your spectrophotometer, check and set the necessary parameters for your specific spectrophotometer before starting measurements in the 'Create' tab.
9.2.2. Scanning spectrophotometer
For a scanning instrument, you will usually find the following parameters in the dashboard:
- Wavelength range (nm)
- Scan speeds
- Scan resolutions
- Measuring the baseline
9.2.3. Diode array spectrophotometer
For a diode array type spectrophotometer, you will typically find these parameters and controls in the dashboard:
- Wavelength range (nm)
- Lamp control (ON/OFF)
- Integration time (ms)
- No. of scans
- Measuring the light source spectrum
- Measuring the background spectrum
-png-1.png?width=660&height=354&name=Q5ZALU6M%20(1)-png-1.png)
9.3. SpectroLink™ properties
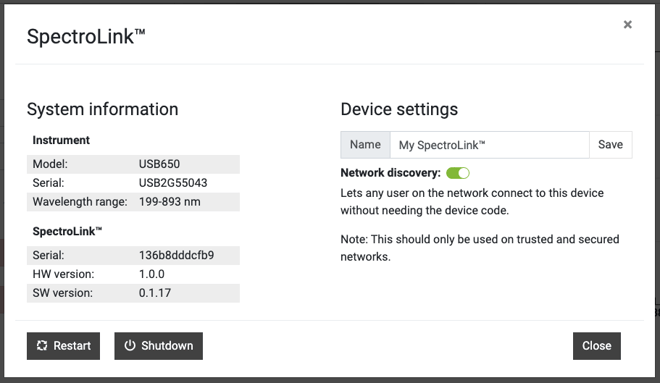
In the top right corner of the SpectroLink™ dashboard, you will find a 'Properties' button. Clicking it opens a settings panel for your SpectroLink™. Here you can:
- View system information about your SpectroLink™, such as the serial number, hardware version, and current software version.
- View system information about your spectrophotometer, including the serial number (if available).
- Set the name of your SpectroLink™ device (recommended during the first setup).
- Enable Network Discovery (more details below).
- Shut down your SpectroLink™.
- Restart your SpectroLink™.
9.4. Network discovery
For certain use cases, you may want your SpectroLink™ to be visible to all SpectroWorks™ users on the same network. This allows them to see and access the SpectroLink™ without registering its device code. However, it should only be enabled on secure networks where you trust all users. You can enable 'Network discovery' from the Properties panel in the SpectroLink™ dashboard.
9.6. Software updates
To provide the best service and support, we constantly improve your SpectroLink™ by providing over-the-air software updates. Depending on the update type, these updates can extend the functionality of your SpectroLink™, support a wider range of spectrophotometers, fix bugs, and provide overall improvements.
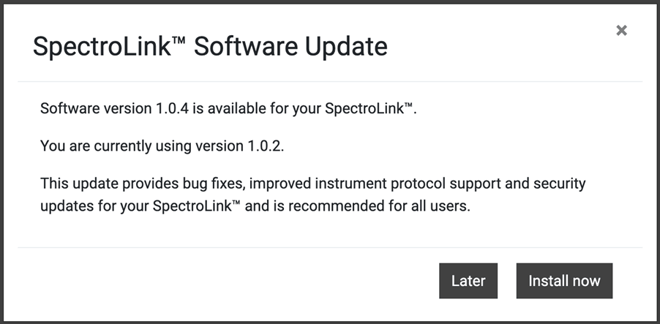
If a new version is available, you will be prompted to update when you access your SpectroLink™. The prompt will display your current version and the new version. Clicking “Install now” will start the installation process:
- Your SpectroLink™ will begin the update process. You will be redirected to a view that shows the progress.
- After the update is complete, your SpectroLink™ will restart and return you to the dashboard.
10. Sample Measurement
Once you have set your desired parameters for your spectrophotometer, you can proceed with your first sample measurement.
Please visit our knowledge base for information, tutorials and FAQs on SpectroWorks™ and our other products via: https://knowledge.cphnano.com/en/pages.
10.1. Setup spectrophotometer for measurement
Before performing measurements, it is important to set up your spectrophotometer with the correct parameters to ensure high-quality spectrum capture. Please refer to our list of supported spectrophotometers at https://spectrolink.com/supported-spectrophotometers.
- Turn on the spectrophotometer and set to USB mode if required.
- Connect it to your SpectroLink™.
- Access SpectroWorks™, find your SpectroLink™ and go to the dashboard.
- Prepare your spectrophotometer by setting the parameters.
After your spectrophotometer has been set up, proceed to the next section.
10.2. Basic measurement
- Go to the “Create” tab located in the top left.
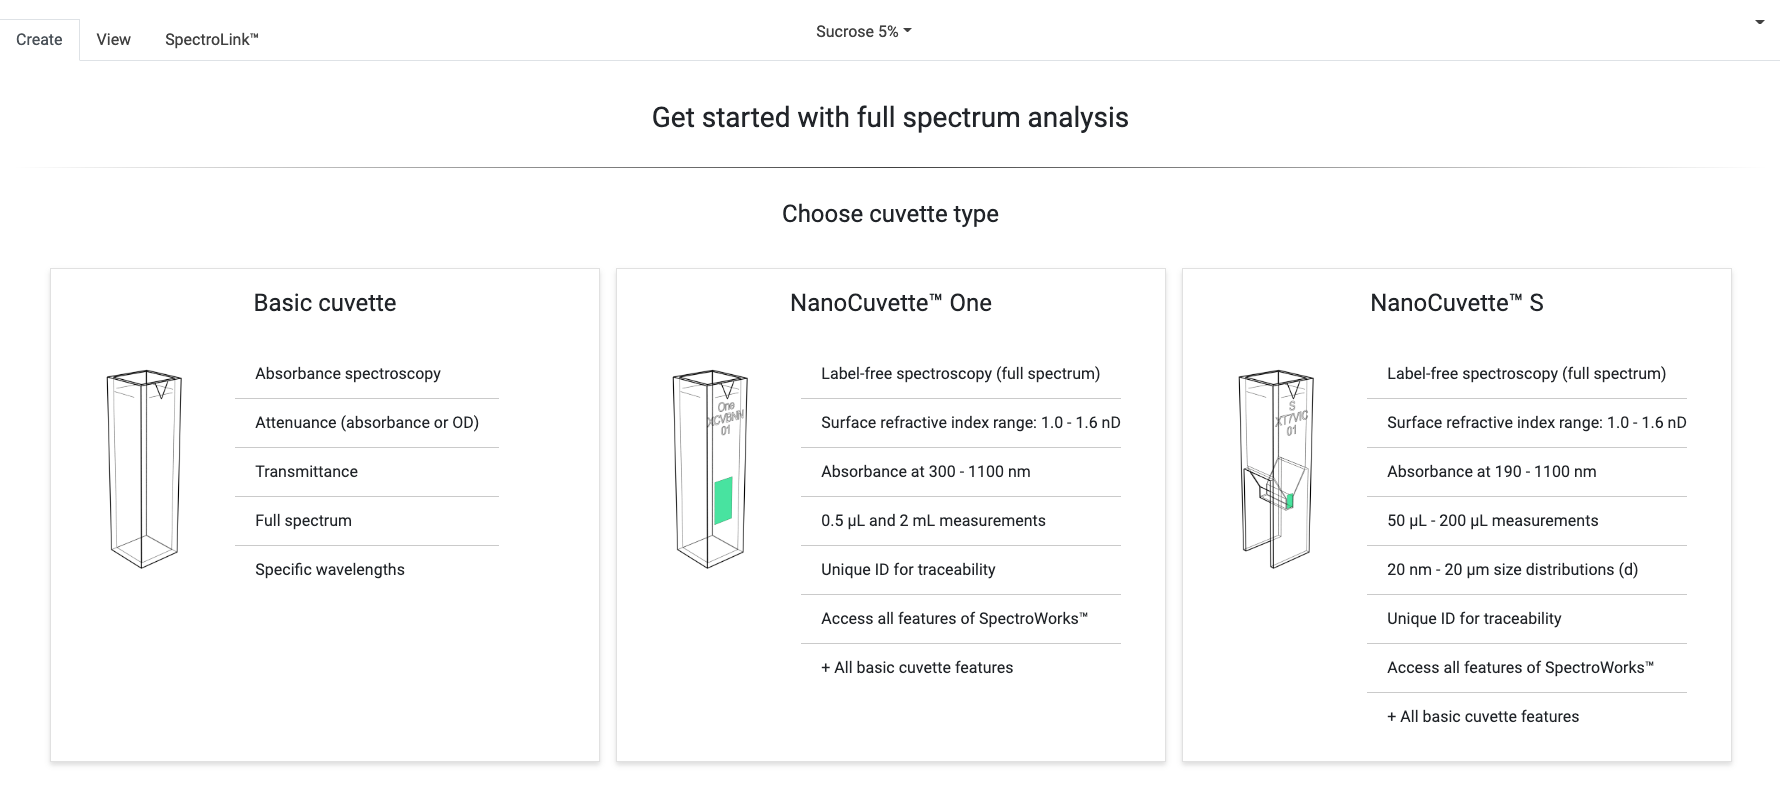
- Choose your cuvette type.
- Follow the instructions. Ensure that your cuvette is facing the right way.
- Click “Capture” on the bottom of the page. If you do not see the “Capture” button then you’re not connected to SpectroLink™. In that case, go to the “SpectroLink™” tab and connect to SpectroLink™.
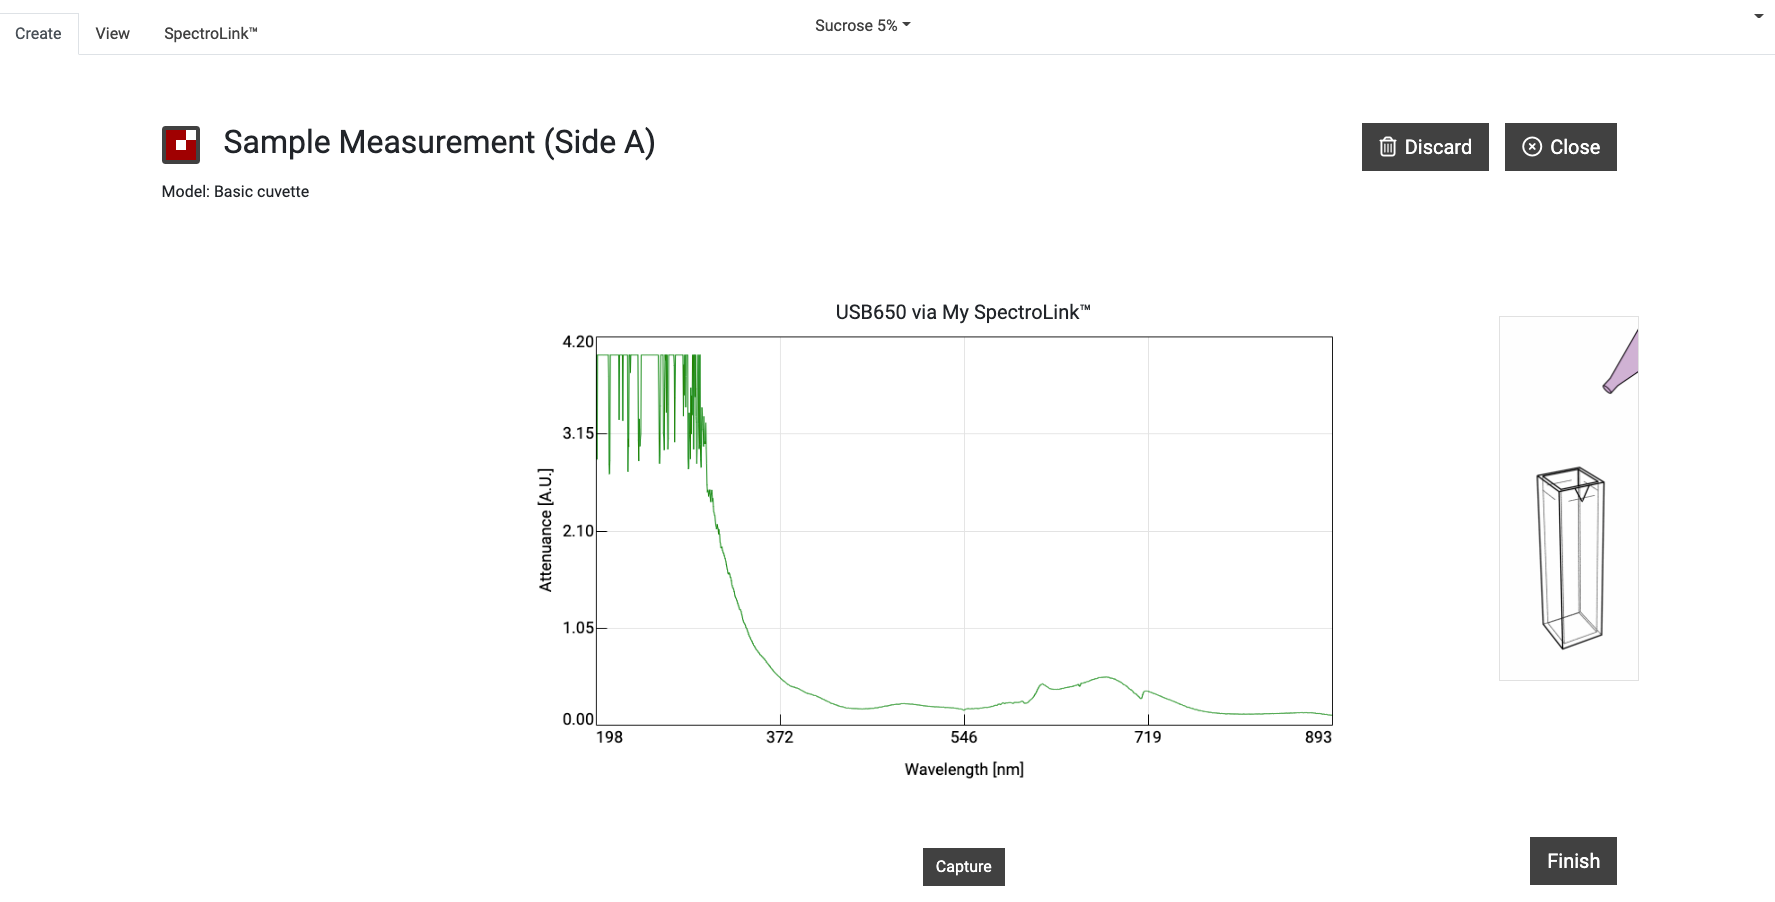
- Your SpectroLink™ will now communicate with your spectrophotometer to request a spectrum.
- If the measurement flow requires more spectra click “Next” and follow the instructions. Once the last spectrum has been captured, click “Finish”.
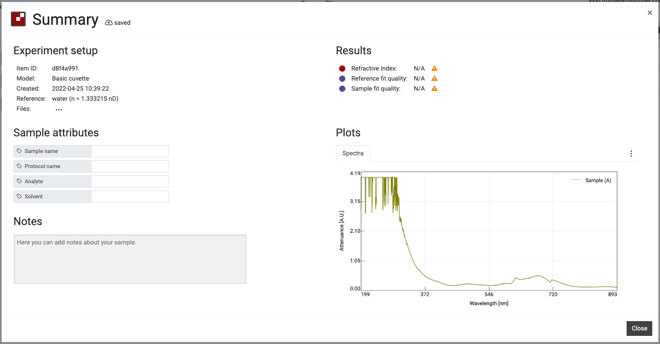
- You will now see a report summary of your measurement. Here, you can add metadata in the "Sample attributes" section and write any notes you need. You can download the captured file(s) from the "Files" section under "Experiment setup" and access all measurement data from the menu in the top right corner of the "Plots" section. Any changes will be saved automatically.